


Key Takeaways
- Pre-writing strokes are the foundational pencil movements, like straight lines, curves, and circles, that children need before they learn letters.
- Mastering these basic writing strokes helps build fine motor control, hand-eye coordination, and visual-motor integration, all of which are vital for fluent, legible handwriting.
- A gradual progression supports a child’s readiness for kindergarten-level writing.
- Fun, hands-on activities make learning strokes engaging and effective.
Before a child writes letters or words, their little hands need to learn how to control a pencil. And the beginning of that is by mastering basic writing strokes. These strokes include simple lines, curves, and zigzags, and are the building blocks for later skills needed to improve their handwriting. Without a solid base, children may struggle with grip, control, and legibility.
In this article, you’ll learn exactly what these basic writing strokes are, why they matter for kindergarten readiness, and how you can help children practise them through easy and fun activities.
What Are Basic Writing Strokes?
Basic strokes are simple pencil movements, like straight lines, curves, and shapes that together form every letter, number, or drawing a child will eventually make. These are sometimes referred to as pre-writing strokes or writing readiness patterns.
Why Do Pre-Writing Strokes Matter for Kindergarten Readiness?
Children who master basic pre-writing strokes early are much more prepared when formal writing begins. One study found that preschoolers with well-developed hand control, shape copying, and in-hand manipulation performed better in handwriting tasks and school readiness assessments. And writing strokes allow children to learn directionality (up, down, left, right), control pressure, coordinate hand and eye, and develop the wrist and finger strength needed for fluent writing.
Research also shows that such fine motor skills and visual-motor integration are strong predictors of school readiness, including writing fluency and legibility. In short, starting with strokes before letters builds confidence, reduces frustration, and supports long-term academic success.
Age-Wise Stroke Development Chart
Here’s a simple guide showing which writing strokes children often master around which age:
| Age | Commonly Mastered Strokes/Skills |
| 2-3 Years | Vertical lines, horizontal lines, simple scribbles |
| 3-4 Years | Circles, large curves, up/down strokes |
| 4-5 Years | Diagonal lines, zigzags, mixing patterns (lines + curves) |
| 5+ Years | Combination of strokes, basic letter-like shapes, and pre-letter patterns |
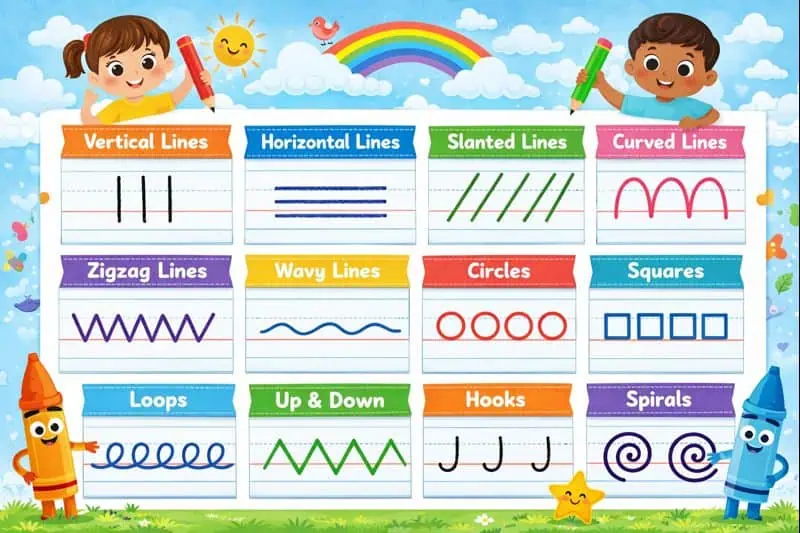
Basic Writing Strokes for Kindergarten Kids
Each writing stroke strengthens a particular motor pathway, which later helps them write letters smoothly. The strokes below are the foundation of early handwriting, and each one plays a specific developmental role.
Vertical Lines (Standing Lines)
Vertical lines help children understand the simplest pencil movement: moving the hand straight up and down without drifting sideways. This stroke introduces them to direction, alignment, and control on paper.
How to teach: A helpful way to teach vertical lines is to let children draw tall, straight lines from top to bottom across wide surfaces like chalkboards or large sheets of paper. When children draw these lines repeatedly in full, controlled movements, it strengthens shoulder stability and wrist control, which they will depend on later when writing letters such as I, T, and L.
Horizontal Lines (Sleeping Lines)
Horizontal lines teach children how to guide their pencil from left to right, a movement that later becomes essential for both writing and reading flow.
How to teach: You can guide the child by demonstrating left-to-right strokes and then encouraging them to draw “roads” or “paths” across the page.
Diagonal Lines (Slanting Lines)
Diagonal strokes challenge children to control angled movement, which is more complex than vertical or horizontal lines and requires greater hand-eye coordination.
How to teach: Children learn diagonal strokes well when they draw shapes like triangles or roof-tops, which naturally include slanted lines. This gives them purposeful practice and improves their ability to handle angled pencil movements used in letters such as A, K, and V.
Circles
Circles help children practise continuous curved movement, which strengthens smooth wrist rotation and fine finger control.
How to teach: Instead of starting with small circles, begin with large ones so children can use broader arm movements to understand the motion. Gradually introduce smaller circles as their control improves. This progression helps children gain confidence with curved strokes required for letters like o, a, and d.
Zigzag Lines
Zigzag patterns require children to change direction sharply in a repeated rhythm, which helps build control over sudden pencil movements.
How to teach: You can introduce zigzag strokes by creating a simple “mountain trail” or “lightning path” for children to follow. This makes the learning experience playful while strengthening precision, visual judgement, and the ability to change directions while writing.
Wavy Lines
Wavy lines teach children how to create gentle, flowing curves that move in a continuous pattern. This stroke supports fluidity and smooth pencil motion.
How to teach: Provide children with examples of waves, hills, or rolling patterns and ask them to recreate them slowly. This method encourages relaxed hand movement and builds the foundation for writing letters that depend on softer curves.
Left Curve
A left-opening curve is a writing stroke that helps children practise moving their pencil from left to right while creating an outward curve, a movement essential for many handwriting patterns.
How to teach: Begin with finger tracing large left curves on a chalkboard or tray of sand before transitioning to pencil work. This approach strengthens muscle memory and helps children understand how to guide their pencil in controlled curved motions.
Right Curve
A right-opening curve moves in the opposite direction, helping children balance their control over curved strokes.
How to teach: You can demonstrate right curves through imagery, like drawing the shape of a “rainbow opening to the left,” and then guide children to trace and create their own versions. This builds symmetry and confidence in curved movements.
Up Curve
An up curve resembles a gentle hill rising upward and curving over. This pre-writing stroke prepares children for letter connections in future cursive-style writing.
Teaching Method: Start with large hill-like curves on lined or blank paper, and use verbal cues to guide movement. Children follow along more easily when the activity has a visual and verbal anchor.
Down Curve
A down curve looks like a valley dipping downward. It helps children learn controlled descending movement.
How to teach: Model a smooth downward curve and then ask children to draw valleys across the page. This reinforces control over downward pencil motion, which is essential for letters containing curved descenders.
Humps (Connected Arches)
Humps are repeating arch-like shapes that form the base patterns for many cursive and manuscript letters.
How to teach: Ask children to draw continuous humps across a line, similar to creating a string of small connected hills. This builds rhythm, flow, and finger endurance while preparing them for letters such as m, n, and h.
Hooks & Loops
Hooks and loops are writing strokes that introduce children to upward and downward looping motions commonly used in letters like g and y.
How to teach: Introduce loops by having children trace large loop shapes and gradually reduce the size as their control improves. This teaches them how to transition smoothly between upward and downward motion without lifting the pencil unnecessarily.
Crosses & Plus Signs
Cross strokes involve intersecting lines and help children learn how to stop, change direction, and place strokes accurately.
How to teach: You can guide children through simple cross-shaped patterns or dot grids where they must connect lines across a centre point. This improves precision, spatial planning, and pencil placement accuracy.
What Are the Skills Necessary to Develop Pre-Writing Strokes?
Children need several foundational skills before they can confidently learn pre-writing strokes. Below are some skills to ensure their hands, eyes, and body are ready for controlled pencil movements, making early writing experiences positive and successful.
Building Strong Finger and Hand Muscles
Children need strong small muscles in the hands and fingers to grip a pencil comfortably and move it with control. Strengthening these muscles helps prevent fatigue and improves endurance during early writing tasks.
Moving Across the Midline
Crossing the midline is the ability to move one hand across the centre of the body to the other side. This skill is important because writing requires children to move their hand smoothly across the page without switching hands.
Using Both Hands Together With Ease
Bilateral integration allows children to use both hands together in a coordinated way, such as holding the paper with one hand while writing with the other. This coordination helps children stabilise their work and maintain steady pencil movement.
Developing a Comfortable Hold on Pencil
Another main skill required to develop pre-writing strokes is being able to grasp a pencil. A functional pencil grasp helps children hold writing tools securely without extra tension. When children develop a comfortable grasp, they can move the pencil with better precision and write for longer periods.
Strengthening the Upper Body
Stable shoulders, arms, and core muscles provide the foundation children need to keep their bodies steady while writing. Without upper-body strength, maintaining posture becomes tiring, and pencil control becomes difficult.
Understanding Shapes & Patterns Visually
Visual perception enables children to understand what they see, such as shapes, lines, direction, and spacing. This skill helps them copy writing strokes accurately and recognise where each stroke begins and ends.
Practising Everyday Hand Movements
Manipulating objects, such as turning knobs, threading beads, or using scissors, helps children refine hand control and dexterity. These everyday movements train the same muscles needed for controlled writing strokes.
Establishing Hand Preference
Developing a preferred writing hand supports consistency and smoother writing movements. Division of the hand, where some fingers stabilise while others move, helps children hold a pencil correctly while allowing precise finger movements for stroke formation.
How to Develop Pre-Writing Skills & Strokes in Kids: Activities That Help
Here are fun, everyday activities to reinforce stroke practice, while supporting overall fine motor development and coordination:
- Tracing shapes with objects: Objects like string, sticks, and play-dough help children feel the shape physically before pencil use.
- Finger games and play-dough play: These strengthen the hand muscles needed for gripping pencils.
- Construction games or building blocks: They promote bilateral coordination (using both hands) and wrist control.
- Scribbling and doodling: These activities to strengthen pre-writing strokes for kids help build confidence in mark-making, reducing resistance to writing later.
- Dot-marker patterns, cutting along lines with safety scissors: These activities help craft all support hand-eye coordination, visual perception, and hand control.
- Everyday activities: Think about tasks like buttoning clothes, using spoons or tweezers, or threading beads. These also help strengthen fine motor skills vital for writing.
All of these activities meant to develop writing readiness in kids don’t feel like “lessons”. They build the muscular control and coordination children need before formal writing.
How Preschools Support Writing Stroke Development in Kids
Preschools play a unique role in preparing children for writing. A structured, playful, and nurturing environment helps children practise strokes without pressure. Here’s how:
- Dedicated fine motor corners: With sand trays, play-dough, clay or bead threading to strengthen hand muscles gently.
- Pattern-drawing sessions: Daily short activities where children draw or trace straight lines, curves, and shapes.
- Large-scale tracing: Using boards or chalk canvases to practise broad arm movements builds wrist and shoulder control before pencil grip.
- Shape & stroke games during circle time: Teachers guide group activities that help in identifying shapes in the environment. This helps preschoolers build visual recognition and the concept of shapes.
- Progressive stroke-to-letter transition: Once pre-writing strokes are mastered, gradually introduce letter formation, ensuring readiness and reducing frustration.
At KLAY, we follow this holistic and evidence-informed approach to help children build a strong foundation for handwriting! We believe in nurturing readiness, not rushing results. That’s why we embed these stroke-building activities into our daily routines, giving children the time, support, and joy they need to grow into confident writers.
where expert care and a holistic curriculum build strong foundational skills.
Enrol Your Child Now!
FAQs
When should children start practising basic writing strokes?
Children can begin simple strokes, like vertical, horizontal, and circles, around the age of 3-4. More complex strokes, like diagonal, curved, and zigzag lines, typically follow as their fine motor control improves by age 4-5.
How long does it take to master basic strokes?
This varies from child to child. With consistent practice, many children become confident with basic strokes in 2-3 months. The key here is consistent, pressure-free practice.
Can pre-writing stroke practice help if a child has delayed fine motor skills?
Yes. Targeted fine motor and pre-writing stroke training improves handwriting legibility and writing fluency, even when initial skills are weak.
Why is visual-motor coordination important for writing?
Visual-motor integration, like coordinated eye and hand control, helps children trace, copy shapes, and write letters accurately. Children with strong integration tend to produce clearer, smoother writing.
What if a child disinterests or resists stroke activities?
For disinterested children, keep their pre-writing stroke practice short, playful, and varied. Use play-dough, painting, or object tracing. The key is to make it feel like fun, not a chore. Praise effort over precision.


Subscribe to our newsletter
[contact-form-7 id="12706" title="Newsletter Form for post page"]Our Related Blogs
Yoga Benefits, Activities, and Poses for Preschoolers
For preschoolers, yoga isn’t about perfection but about giggles and benefits. So, are you curious how a simple stretch can support a child’s focus, flexibility, and emotional well-being? Let’s roll...
Year-End Reflection and Goal Setting for Children
Parenting is a journey filled with the brightest moments and valuable lessons, both for us and our children. As the year draws to a close, it’s the perfect time to...
Work-Life Balance Solutions for Parents in Emerald Hills Rd, Sector 65, Gurugram: The KLAY Daycare Advantage
Finding the perfect balance between professional commitments and parenting is a challenge for many working families in Gurugram. Parents in Emerald Hills Rd, Sector 65, especially, look for childcare solutions...